This guide helps beginner home bakers choose and use dessert decorating tools to finish a cake, cupcakes, cookies, or another dessert. You will prepare a simple decorating setup, practice basic piping and spreading, and check the finished result. Allow 30-60 minutes for decorating, not including baking or any chilling time. You do not need professional equipment: a few well-chosen tools and a stable work surface are enough to get started.

Get baking supplies delivered free with Prime
- Fast, free delivery on millions of items
- Prime Video, Amazon Music and more included
- Member-only deals all year

69-Piece Cake Decorating Kit with Piping Syringe, 54 Nozzles, and Silicone Cupcake Molds
- ✔ Pieces: 69
- ✔ Nozzles: 54: 6 medium and 48 small
- ✔ Dispenser: Stainless steel piping syringe with press-style handle
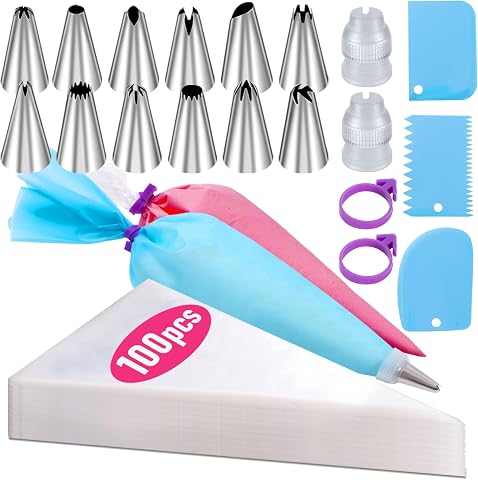
Piping Bags and Cake Decorating Tips Set, 100-Piece
- ✔ Disposable bags: 100
- ✔ Bag length: 14 inches
- ✔ Reusable bag: 1 silicone piping bag

Wilton Dessert Decorator Plus Piping Kit with Plunger
- ✔ Brand: Wilton
- ✔ Included tips: 4 decorating tips and 1 filling tip
- ✔ Couplers: 2
Difficulty: Beginner | Time: 30-60 minutes, plus time to chill the dessert if needed
What You’ll Need
Tools & Materials:
- Offset spatula or small straight spatula
- Piping bags, disposable or reusable
- One or two piping tips, such as a round tip and an open star tip
- Coupler if you plan to change tips on one piping bag
- Bench scraper or cake smoother for layered cakes
- Small bowls, spoons, and a spatula for mixing and transferring frosting
- Scissors
- Parchment paper or a clean plate for practice
- Damp cloth and warm soapy water for cleanup
Knowledge:
- Basic kitchen safety and handwashing
- How to handle prepared frosting or icing
- Ability to follow a recipe or use a baked, cooled dessert
Start with a fully cooled dessert; warm cake can melt frosting and loosen decorations. Pick tools for the finish you want rather than buying a full kit. A spatula and one piping tip cover many beginner tasks. Check that reusable bags and tips are clean and dry before filling them. If you are decorating a large cake, set it on a level board or serving plate that can turn freely.
69-Piece Cake Decorating Kit with Piping Syringe, 54 Nozzles, and Silicone Cupcake Molds
For decorators who want one set to cover several kinds of kitchen tasks, HE-SANQI is the most versatile choice in this group. Its 54 interchangeable nozzles give us substantially more pattern options than Wddeevoi’s 12 tips or Wilton’s four decorating tips. Six medium and 48 small nozzles create a broad assortment, although the emphasis on small tips may be less useful for anyone who mainly pipes large rosettes or thick borders.The press-style stainless steel syringe is designed for one-handed application, which can be appealing when we want a compact dispenser rather than squeezing a flexible bag. That design is a real preference call: Wddeevoi is the better fit for someone who wants to work with piping bags, and Wilton offers a similar plunger approach with a more focused set of attachments. Three scrapers and nine silicone cupcake molds extend the kit beyond piping, but they also mean more pieces to store. The molds’ stated temperature range is broad, and their flexible material is designed to release baked goods easily. Choose this set for breadth, not minimalism.
Pros:
- 54 interchangeable nozzles provide the widest stated pattern selection in this comparison.
- Press-style handle is designed for one-handed frosting application.
- Includes three scrapers and nine flexible silicone cupcake molds, not just piping accessories.
- Stainless steel syringe and nozzles are designed for repeated use.
Cons:
- The many small interchangeable pieces call for organized storage.
- The syringe may feel less familiar or controlled to people who prefer a traditional piping bag.
- The nozzle assortment is weighted toward small tips, which may not suit every decorating style.
Best for: Home bakers who want varied piping patterns plus molds and scrapers for cupcakes and cake finishing.
Not ideal for: Decorators who prefer a traditional piping bag, need a small easy-to-store kit, or want to avoid sorting many interchangeable parts.
Bottom line: We recommend HE-SANQI when breadth matters most and the extra attachments are worth managing.
“We recommend HE-SANQI when breadth matters most and the extra attachments are worth managing.”
Piping Bags and Cake Decorating Tips Set, 100-Piece
Wddeevoi makes the strongest case for decorators who already know they prefer piping bags. The set includes 100 disposable 14-inch bags, a reusable silicone bag, and 12 stainless steel tips. Compared with HE-SANQI’s syringe, this format gives us a familiar squeeze-bag workflow; compared with Wilton’s plunger, it is better suited to switching bags or colors without relying on a single dispenser. Textured bags are designed to improve grip, while the thicker construction is intended to withstand pressure.Its main advantage is also its clearest compromise: disposable bags simplify bag cleanup but create waste and need replacing after each use. There is only one reusable bag, so repeated decorating sessions still mean washing it or reaching for another disposable. The 12-tip selection is far smaller than HE-SANQI’s, and the kit lacks cupcake molds. Three scrapers add useful smoothing support, but this is not the broadest all-purpose bundle. We would choose it for practical, bag-centered decorating rather than maximum tip variety or a compact reusable system.
Pros:
- Includes 100 disposable 14-inch bags for repeated decorating tasks.
- Textured, thickened bags are designed to support grip and withstand pressure.
- Adds one reusable silicone bag for occasions when a washable option is preferred.
- 12 stainless steel tips, a coupler, ties, and three scrapers support common decorating jobs.
Cons:
- Disposable bags need to be discarded after use, creating ongoing waste.
- Only one reusable piping bag is included.
- Its 12 tips offer less pattern variety than HE-SANQI’s 54 nozzles.
Best for: Bakers who prefer piping bags, decorate in multiple colors, and want disposable bags to reduce washing between tasks.
Not ideal for: Buyers seeking the largest tip assortment, a fully reusable setup, or extra baking accessories such as silicone molds.
Bottom line: We would choose Wddeevoi for a bag-first workflow and reduced bag washing, not for maximum versatility.
“We would choose Wddeevoi for a bag-first workflow and reduced bag washing, not for maximum versatility.”
Wilton Dessert Decorator Plus Piping Kit with Plunger
Wilton takes a more focused approach than the two larger kits. Its plunger-style decorator is designed to dispense icing with one hand, and the included filling tip extends its use to pastries and other treats. For a buyer who wants a dedicated reusable tool rather than a box of molds, bags, scrapers, and dozens of tips, that simplicity can be a benefit. The plunger format also distinguishes it from Wddeevoi’s bag-based set, while resembling HE-SANQI’s press-style syringe in how the icing is dispensed.The tradeoff is range. Wilton includes four decorating tips and one filling tip, far fewer than either competing kit’s stated decorating-tip selection. That is enough for a narrower set of designs, but it will not serve someone building a broad library of piping patterns. Cleanup is mixed, too: the cylinder, bottom ring, tips, and couplers are listed as top-rack dishwasher safe, while the plunger must be hand-washed. Compared with HE-SANQI, Wilton is more restrained but omits molds and scrapers; compared with Wddeevoi, it avoids disposable bags but does not offer a traditional bag workflow. Choose it when the dispenser itself is the priority.
Pros:
- One-handed plunger is designed to provide controlled icing flow.
- Includes a filling tip as well as four decorating tips.
- Reusable format avoids relying on disposable piping bags.
- Cylinder, bottom ring, tips, and couplers are top-rack dishwasher safe.
Cons:
- The plunger must be washed by hand.
- Four decorating tips provide less variety than the other kits in this roundup.
- Does not include the molds and scrapers found in HE-SANQI or the disposable bags supplied by Wddeevoi.
Best for: Bakers who want a reusable plunger tool for controlled icing and filling pastries, cakes, candies, or appetizers.
Not ideal for: Decorators who need many tip styles, want a traditional piping bag, or expect every component to be dishwasher safe.
Bottom line: Wilton is the better fit when we want a dedicated reusable plunger and filling function over a broad accessory assortment.
“Wilton is the better fit when we want a dedicated reusable plunger and filling function over a broad accessory assortment.”
As an Amazon Associate we earn from qualifying purchases.
Before You Start
Decide on a simple finish before you assemble tools: for example, a smooth frosting layer with piped borders, or cupcakes topped with one rosette each. Keep frosting at a texture that spreads easily but holds its shape. If it feels stiff, follow the frosting recipe’s adjustment guidance; if it is runny, chill it briefly and test again. Work away from direct heat, and keep perishable fillings and frostings refrigerated when they are not being used.
Wash and dry tools before use. Avoid touching food-contact surfaces after handling packaging, phones, or other unwashed items. If a recipe or tool manufacturer gives specific care instructions, follow those instructions, especially for plastic parts, coated tools, and reusable piping bags.
Step-by-Step Instructions
Step 1: Choose tools for the decoration
Match each tool to a specific job. Use an offset spatula to spread frosting on a cake or cupcake. Use a bench scraper to smooth the sides of a larger cake. Choose a round piping tip for dots, lettering, or simple lines, and an open star tip for ridged shells or rosettes. Use a small sieve for a light dusting of cocoa or powdered sugar. Leave specialty cutters and multiple tip shapes aside until you need them.
Tip: A small, manageable tool set is easier to control than a crowded collection. Check that the tip opening is large enough for any sprinkles, fruit pieces, or other inclusions in the frosting.
Check: You can name the job each selected tool will do, and every tool is clean, dry, and ready to use.
Step 2: Prepare the dessert and work surface
Place the cooled dessert on a stable board, plate, or tray. Remove loose crumbs with a clean, dry brush or your fingertips. If you are assembling cake layers, level them as needed and place the bottom layer securely on the board. Set the dessert on a nonslip surface; a damp cloth beneath a plate can help keep it from turning while you work.
Tip: For a layered cake, apply a thin crumb coat before the final frosting layer. Chill the coated cake until the surface feels firm so loose crumbs are less likely to mix into the finish.
Check: The dessert is cool, stable, and free of loose crumbs that could streak the frosting.
Step 3: Set up a piping bag
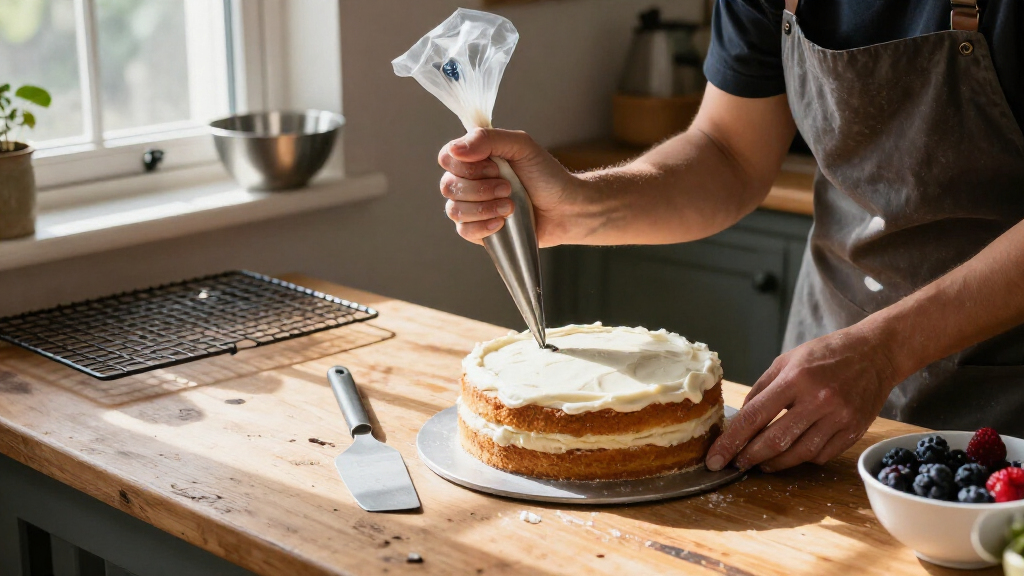
Fit a piping tip into a piping bag. If you are using a coupler, place its base inside the bag, trim the bag tip only enough to expose the threads, then secure the decorating tip with the ring. If there is no coupler, insert the tip and trim the bag so the opening ends just above the narrow end of the tip. Fold the top of the bag over your hand or a tall glass, then spoon frosting into the bag. Fill it no more than halfway, press out large air pockets, and twist the top closed.
Tip: Do not cut the bag too high: frosting can leak around the tip. A half-full bag is easier to grip and control; refill it when needed.
Check: The tip sits securely, frosting does not leak around it, and the closed bag is comfortable to hold.
Step 4: Practice pressure and movement
Pipe a few shapes onto parchment paper or a clean plate before decorating the dessert. Hold the bag near the twisted end with your dominant hand and guide the tip with your other hand. Squeeze from the top with steady pressure, then release pressure before lifting the tip. Try a line, several dots, and one shell or rosette. Scrape the practice frosting back into the bowl only if the surface and tools stayed clean.
Tip: Keep the tip close to the surface for defined shapes. If the frosting comes out unevenly, stop and check for an air pocket, a blocked tip, or frosting that is too stiff.
Check: You can pipe several shapes of similar size without the frosting sputtering or the bag slipping.
Step 5: Apply frosting with a spatula
Place a generous amount of frosting on the top of the dessert and spread it outward with the spatula. For cupcakes, use small strokes to cover the top; for a cake, spread the top first, then add frosting to the sides. Hold the spatula at a shallow angle and turn the cake or plate as you work rather than repeatedly dragging the blade across the same area. Add frosting as needed to cover bare spots.
Tip: Use a separate clean utensil to take frosting from the bowl. Do not return a crumb-covered spatula to the main bowl, because crumbs can affect the remaining frosting.
Check: The dessert has a continuous frosting layer with no exposed patches, and the cake remains stable on its board.
Step 6: Smooth the finish if desired
For a smooth-sided cake, hold a bench scraper vertically against the side and turn the cake slowly. Keep the scraper steady and remove excess frosting in light passes. Smooth the top by drawing the spatula from the outer edge toward the center. Wipe the blade clean between passes. Stop when the surface looks even; repeated scraping can pull frosting away from the cake.
Tip: If the frosting is soft and smears instead of smoothing, chill the cake briefly before trying again. Do not press hard enough to shift the cake layers.
Check: The sides look reasonably even, the top edge is tidy, and the scraper has not exposed cake or dragged crumbs into the frosting.
Step 7: Pipe the planned decorations
Hold the prepared bag at a consistent angle and pipe the chosen design, such as a border, dots, or cupcake rosettes. Use even pressure and repeat the same movement for each decoration. Leave space between shapes if you plan to add fruit, chocolate, or sprinkles. Add fragile or heavy toppings gently so they do not flatten the piped frosting.
Tip: For lettering or a detailed border, mark a light guide on parchment or use a clean skewer to plan spacing. Keep the design simple enough to finish before the frosting warms.
Check: The decorations are securely attached, reasonably consistent in size, and distributed as planned.
Step 8: Clean and store the tools
Scrape leftover frosting into a suitable container and refrigerate it if the recipe calls for refrigeration. Disassemble piping tips and couplers, then wash them with warm soapy water and rinse away frosting from small openings. Wash reusable bags according to their care instructions and dry them fully before storage. Clean spatulas and scrapers, then store dry tools where tips will not bend or get lost.
Tip: Check narrow tip openings before putting them away; dried frosting can block them the next time you decorate.
Check: Tools are visibly free of frosting, fully dry where they are stored, and ready for another use.
Common Mistakes to Avoid
- Filling the piping bag too full. — Fill it only halfway, twist the top closed, and refill when the bag becomes difficult to control.
- Decorating a warm or crumbly dessert. — Cool the dessert fully, remove loose crumbs, and chill a crumb-coated cake before applying the final layer.
- Cutting too much off a piping bag. — Trim a small amount at a time and test the fit before adding frosting. The bag should hold the tip securely without exposing too much of its base.
- Pressing hard while smoothing frosting. — Use light, steady passes and turn the cake or plate. Chill soft frosting briefly rather than forcing the scraper through it.
Troubleshooting
Problem: Frosting leaks where the piping tip meets the bag.
Solution: Stop squeezing, remove the frosting from around the opening, and check that the tip or coupler is seated correctly. If the bag was cut too high, transfer the frosting to a new bag with a properly fitted tip.
Problem: Piped shapes look rough, broken, or uneven.
Solution: Check the tip for a blockage and massage the bag gently to remove air pockets. Let very stiff frosting soften slightly, or chill frosting that is too soft, then test again on parchment.
Problem: Frosting pulls crumbs from the cake.
Solution: Stop spreading and chill the dessert until the frosting firms. Apply a thin crumb coat, chill it, then add the final layer with clean utensils and light strokes.
Problem: The cake or plate moves while you decorate.
Solution: Place a damp cloth or nonslip mat beneath the board or plate. If the cake itself shifts, secure it to its board with a small dab of frosting before continuing.
What Success Looks Like
The dessert is stable, fully covered where intended, and decorated with shapes that hold their form. Frosting is not visibly contaminated with loose crumbs, piping does not leak from the bag, and the design looks balanced from the viewing angle. You should be able to move the dessert carefully without decorations sliding off. Afterward, tools should be clean and stored dry.
Next Steps
Serve the dessert according to the storage needs of its frosting and filling; refrigerate perishable components as directed by the recipe. For the next decorating session, repeat the same design with one additional piping shape or tool rather than changing several things at once. Replace a bag or tip if it is torn, bent, rusted, or difficult to clean. Follow care guidance for any specialty tools, and ask a food-safety professional or consult a reliable recipe source if you are unsure how long a decorated dessert can remain at room temperature.
Frequently Asked Questions
What dessert decorating tools should a beginner buy first?
Start with an offset spatula, a piping bag, and one round or open star tip. Add a bench scraper if you plan to frost whole cakes. You can decorate many desserts with these basics without buying a large kit.
Can I decorate without a piping bag?
Yes. Use a clean spoon or spatula to make swirls and textured peaks. For simple piping, place frosting in a sturdy food-safe bag and trim a very small corner, then test the opening on parchment before decorating.
How do I choose a piping tip?
Choose a round tip for dots, lines, and basic lettering, or an open star tip for ridged borders and rosettes. A larger opening works better for broad swirls; a small opening gives finer lines. Check that the tip fits your bag or coupler.
Why does frosting keep sticking to my spatula?
Frosting may be too soft, or the blade may be moving at too steep an angle. Chill the frosting or dessert briefly if it is warm, and use a shallow angle with light strokes. Wipe the blade clean between passes.
How should I clean reusable piping tips?
Remove each tip from the bag or coupler and wash it with warm soapy water. Clear the narrow opening with a small cleaning brush if needed, rinse it, and dry it fully before storage. Follow the manufacturer’s care instructions for any coated or specialty parts.